Search This Blog

Usefull Websites

Seed Companies

  • Royston-Petrie Seeds P.O. Box 1152 Ph: (61) 2 6372 7800 www.roystonpetrieseeds.com.au
  • Cornucopia Seed Cornucopia Seeds and Plants Ph (03) 5457 1230 http://cornucopiaseeds.com.au
  • Select Organic M.S 905, Lower Beechmont 4211 www.selectorganic.com.au Organic Seeds
  • GreenHarvest 52 Crystal Waters, M.S. 16, MALENY 4552 Ph: (07) 5494 4676 www.greenharvest.com.au
  • Greenpatch PO Box 1285, TAREE, NSW 2430 (02) 6551 4240 www.greenpatchseeds.com.au enquiries@greenpatchseeds.com.au
  • The Italian Gardener Allsun Farm, PO Box 8050, Gundaroo, New South Wales, 2620 (02) 6236 8173 www.theitaliangardener.com.au info@theitaliangardener.com.au Italian vegetable seeds
  • Kings Seeds PO Box 2785, Bundaberg, QLD 4670, Australia Tel: 07 4159 4882 www.kingseeds.com.au
  • Phoenix Seeds PO Box 207 , Snug, TAS, Australia 03) 6267 9663 Only postal Very unusual seeds
  • Diggers www.diggers.com.au info@diggers.com.au Fantastic company become a member and help them in their work, they have two sites, St Erith (nr Daylesford) and Heronswood (Mornington Peninsula) and when you become a member you get sent out a free magazine / newsletter
  • Eden Seed M.S. 905, Lower Beechmont 4211 (07) 5533 1107 www.edenseeds.com.au Lots of information botanical and taste
  • The Lost Seed The Lost Seed PO Box 321 SHEFFIELD TAS 7306 ph: 03 6491 1000 www.thelostseed.com.au Has a selection of very rare vegetables, and a great free download of sow what when chart

Friday, September 16, 2011

Spring is in the air the back garden is starting to get planted

 Starting the vegetable garden out the back has been a long time coming, but I guess that is what winter is for. The beds are prepared, well most of them, so time to start planting. On the left are some cherry tomatoes, its still a bit early so I have given them a bit of protection with half milk bottle containers. The other half will be turned into plant labels. Tomorrow I start on the compoist bins. I will be building a new zealand box from scrap timber and some bought timber. It will be a four bin configuration, trying to explain it is too hard, so I will just show you the pictures when it is done. Looks like rain too now.
The potatoes in this bed just appeared, I might of chucked some old ones in from the cupboard that were starting to shoot, and I think that is a russian garlic growing through the middle. You can just make out the globe artichoke at the back.                                                                                     

 This bed is VERY shallow I built it on top of a path, so it will be great for growing fast greens. Like lettuce and asian greens. Four different types so far. According to the website gardenate.com
Easy to grow. Sow in garden, or start in seed trays and plant out in 4-6 weeks.. Sow seed at a depth approximately three times the diameter of the seed. Best planted at soil temperatures between 8°C and 27°C. (Show °F/in) Space plants: 20 - 30 cm apart Harvest in 8-12 weeks.Compatible with: Carrots, Onions, Strawberries, Beets, Brassicas, Radish, Marigold, Borage, Chervil, Florence fennel, leeks.
Avoid growing with: Parsley, Celery ,
No parsley out the back yet, but some growing wild out the front, I should take some photos of what is happening out the front......
This bed is garlic, two sorts the giant russian garlic that was given to me by a lady who claims it has been passed down four generations of her family. The rest is some garlic I bought from green harvest about 5 years ago and it is still going. Behind that bed is some

Sunday, August 28, 2011

Esther Dean


Esther tells the story of the transformation of her backyard garden.
'You couldn't dig the ground - it was just clay. I suggested to Tom that we make a concrete edge and build a garden above the ground. On the first garden it was only lucerne hay and then compost. Then, after building a frame, I put a layer of paper, about 1/4 inch thick; on top of the paper, padded lucerne hay as it came from the bale and then on top of the lucerne hay a little fertiliser. That was chicken manure. On top of that, about 8 inches of loose straw, a little fertiliser again and on top of that about 4 inches of compost. I planted the seeds and it was just like something magic. The zucchini just grew and grew and the beans just grew - it was incredible what happened.'

The devil is in the detail-No Dig Beds


No Dig Beds
In the front of my garden and in the back I have improved the soil and created raised beds using the No Dig Method developed by Esther Dean in the 1970's in Sydney.

It's fairly easy to build a No-Dig bed and try to use materials already in your garden.
I am fortunate enough to have a beautiful Liquid Amber in my back garden , a large deciduous tree that produces a mountain of leaves every autumn. So the bulk of the organic matter comes from the tree.
It is important when building a No-Dig Bed to try and use a variety of materials, this makes for better soil.

This garden bed was built using eco timber a pine not treated with arsenic, but a non-poisonous treatment. Some of my garden beds are made using treated pine, but because I have a very healthy soil and lots of bio-active compost full of fungi and microbes and am aware that they will 'lock' up the heavy metals in the soil and make them unavailable to plants and therefore me.
As you can see in the garden bed, it is full of straight kitchen scraps grass and other organic material.

I then top with a layer of composted mixed manure from Mr Poo, then straw that has been shredded by my 'gals' in the chook house and added with extra nutrients.

How to build a No-Dig Bed

Step 1
Mark out the area and edge it with bricks or any material that will contain the soil when it is built. Four square metres is a good size to start, but this can be expanded later.

Step 2
Cover the entire area with wads of newspaper a good 'herald sun' thick to smother any weeds. Overlap the pages so there are no gaps for weeds to grow through, and avoid using as much coloured print as possible. Water the area newspaper well so that it starts breaking down immediately. I find cardboard is a good barrier too. DO NOT do this on a windy day or you will be driven mad with the blowing paper.

Step 3
Cover the area with high carbon organic matter, which will break down easily. This could be by pea-straw or crop-straw like rye or canola, grass, leaves whatever is cheap and available. Crop-straw is usually less expensive than lucerne or pea-straw, but is lower in nitrogen. Water the matter lightly.

Step 4
Next apply a layer of organic fertiliser. Chicken manure is excellent because it has high amounts of nitrogen, which helps the breakdown high carbon materials, but any farm manure will perform the function.

Step 5
Add a 20-centimetre layer of high carbon material.

Step 6
Add another layer of manure and again water lightly. Of course you can create as many layers as you like.

Step 7
Finally, you will need some good compost to plant the seeds and seedlings into. If there is enough available, the whole surface area of the garden could be covered with compost to about 10 cm. Alternatively pockets of compost can be created for planting so that it can support a new plant while the new garden is breaking down.


The same has been done out the front, but in a more free form way.

Saturday, August 27, 2011

Long time no see, too busy in other peoples gardens


I was talking to a friend of mine the other day and she remarked that she was getting 'bothered' that I hadn't written anything in my blog for a while so it has been a while, I have been REALLY busy.
What have I been up to since I renovated the chook house?
1. Project Worker for Green It Grow it at Cloverdale Community Centre-check them out on Facebook`this invovled teaching edible gardening at TWO neighbourhood houses
2. Doing my Mast of Urban Horticulture, phew, FULL TIME
3. Being Chair of Geelong Organic Gardeners
4. Being President ofGeelong West Community Gardn
5. Talking to Workskil about my new and exciting project
so excuse me I haven't had time to write in the blog

But since I took leave of abscence from my Masters resigned the two gardening orgs, I not only now have time to write in my Blog, but I have been working in MY garden, yip yipee.

Saturday, January 8, 2011

Chicken Coop Renovations


I have had some time off studying and less work with the holidays and decided to renovate the chicken house.
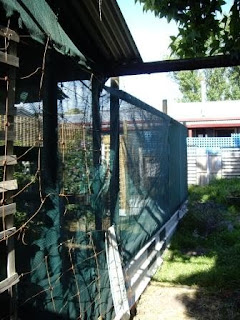
The old one was too shady in the winter and didn’t provide enough cover when it rained it was basically an old shade house, and it meant the chickens had to be allowed to wander the garden for a few hours a day. This means they ‘poop’ by the back door, eat all the strawberries and destroy the garden. However they do eat all the slugs and snails.

After much thought, I decided to leave the frame of the old shade house, it is solid steel and all welded together, and its in a good location near the London Plane which provides shade and cooling in the summer, but being deciduous lets more sun in the winter.
Nesting box

The roof is built out of corrugated iron that was left over from the last garden, all fixed using screws, then it can be used again, I found a large piece at the tip shop, and only had to buy one piece new. I canabalised the shade house for their ‘run’ and plan to plant two fruit trees in there. The girls like to hide under shrubs and eat the leaves and generally play underneath trees. Also they will eat the dropped fruit and prevent pests and diseases.

A friend gave me some old fencing wire which I plan to grow Chinese jasmine up, beautiful scent and will cope with the shade. There will be a garden bed around the house, and the water from the bathroom, will run into an agi pipe under the bed. I found an enormous roll at the tip shop.
Brown leghorns and Old english game birds, getting into the camera


The chickens like a bit of privacy and it is easy to access the eggs from outside the coop, this old cupboard is perfect. The boxes are lined with newspaper easier for cleaning and bedding is sugar cane mulch , holes are drilled in the bottom for ventilation.

The chickens are three different breeds, old english game birds, very feisty they were bred as fighting birds and can be quite noisy, they ahve survived two dog attacks though. A good old isa brown, she is getting on a bit, but is wise old thing. Three brown leghorns, these are great one is a survivor of the dog attack and the other two were recompense from the dog owner. Why cant people control their dogs, ugh, they bark all night and then attack my animals. They now have    new security.


A friend of mine wanted to keep bees but had nowhere to keep them as his wife objected to Bees. I was more than happy. Apparently they produce up to 90kgs a new. I think the end of sugar in my house

Thursday, January 6, 2011

Blueberry Facts

Fruit Fact Sheets

Fruit
Blueberry

Vaccinium sp

They have the highest antioxidant levels of any fruit and high in vitamin C. They are expensive in the shops, but are relatively easy to grow in the home garden. They are a relative of the rhododendron and produce delicate bell like pink to white flowers. In autumn the leaves turn red, orange and copper, as well as edible they are highly ornamental. They require a good winter chilling, and although self fertile, will produce larger berries when planted with other varieties.

When to Plant

Best planted during the cooler seasons, preferably during winter. Plant deeply that is above the soil line of the pot, (long stem planting), this ensures good root development and protects the root ball from drying out. Add plenty of organic material to the soil before planting.

Position

The plant originates in North America so won’t cope well with strong Australian sun, so best planted in dappled shade.


Soil Preparation

They require a soil pH of 4.5-5.5, that is an acid soil, although the hybrids are more forgiving of an alkaline soil. If they are mulched with pine needles that will reduce the pH of an alkaline soil.

Care

Blueberries have a fibrous root system, so it is very important that the roots are not allowed to dry out. Mulch well with acidifying mulches, such as oak leaves or pine needles.

Pruning
Do not allow them to produce fruit for the first two years, so that the plants energy is put into the roots and stems. After 3-4 years the stems become unproductive and should be pruned at ground level or cut to a vigorous side shoot. Keep the centre of the bush open and cut out any week, weeping or dead wood.

Harvesting

They yield 3.5 kg per bush, between December and March.

Common Problems

The blueberry suffers from very few pests or diseases. Birds will eat the fruit, so bushes are best netted to protect the harvest.

Varieties
Bluerose-tall and extremely prolific, harvest Dec-Feb 2.4m H x 2m W
Reveille-A smaller bush, delicious and sweet, harvest Dec-Jan 1.8m H x 1.5m W

Brigitta- Has masses of large, sweet, pale blue berries ripening around the same time. Yield can be 6-9 kg when mature. Harvest Jan to Feb. 2m H x1.5m W

Northland'-has a very dark flesh with a wild-berry flavour becoming sweeter the longer they hang on the bush. Very hardy to extremes of heat and cold.

Nellie Kelly- is a delightful, evergreen bush producing pink flowers during the winter and delectable fruit in late spring and summer. The bush is frost tolerant and needs to be planted in areas where overnight temperatures drop below 5C degrees during winter as this helps to promote the flowers. 1m H x 1m W


Sources

Clive Blazey and Jane Varkulevicius The Australian Fruit and Vegetable Garden

Chicken Coop

I have had some time to breathe recently, well it is the holidays from uni, so the girls have a new house. Mostly built from recycled materials, (except for the posts)and basically I cannibalised the old shade house. The run now provides them with more shelter in winter and more sun. Plan to plant two fruit trees in the run the provide more shade and interest for the girls, well then they can pick their own. Also plan to plant a wormwood in the run, a cutting from the plant out the front.

Radio Show

In the pursuit of ever more exposure, and being a total media slut. I now am involved in a local radio show Dig It, on Pulse Radio 94.7FM Saturdays 10-11 AM. Listen in for all things horticultural, and myself talking on fruit and veggies. Only available to those in the Geelong region, although has a wider range depending on the weather!!!